Squarespace floating button - CSS & How to Guide!

Just yesterday I got a lovely email in my inbox from Eliza who asked me if I had a tutorial for the rather lovely Squarespace floating button that lives on the right side of my site.
Now, although I didn’t yet have a post on it despite having 21+ fabulous Free Squarespace plugins & CSS snippets, I was so charmed by her sweet words that I thought I’d whip one up!
So here’s everything you need to know to create a floating book now button on your Squarespace site, and customise it so it perfectly fits your brand and makes taking the next step to work with you unmissable (that’s whatcha want right?!)
Oh, and before we start, this sticky, floating button tutorial contains a spot of Html and CSS.
Not code-confident? Don’t fret - it’s not as scary as it sounds - follow the steps one by one and you’ll have your own Squarespace floating button in no time! And if you’re code curious - make sure to check out this Free Workshop from Rache at Square Stylist (I also highly recommend bingeing her Youtube channel!)
This post may contain affiliate links. If you make a purchase via one of these links I may get a small kickback. I only recommend products and services I use and love myself! Thanks in advance :)
Add a floating button to Squarespace step by step Guide
By following the simple steps below you’ll find that adding a floating button to your Squarespace site, styling it for mobile and so it matches your brand and even adding a hover animation to your floating button is pretty simple, but before we get started, here are a couple of questions I’m bettin’ you might have. Don’t have questions and just want to get going? Skip to the Squarespace floating button step by step guide!
You Might be wondering…
Questions about adding a floating button on Squarespace
-
The awesome benefit of having a sticky floating call to action on your Squarespace site, or any site for that matter is that it’s visible everywhere - from any page, and wherever you are on the page making your primary website call to action as easy as possible for people to take!
-
Absolutely not! With a few simple steps you can easily copy and paste the CSS snippets above to create your own floating button. And with the explanation of what bit does what, you’ll be able to style it too!
-
You can add a floating button with any plan - from personal onwards (see more about Squarespace plans here). However… do note that if you want to add your button on one page only you’ll find it easier to do with the business plan upward.
-
Nope! We’re just going to need a small snippet of HTML and a little CSS - everything’s well explained in the step by step guide below!
-
For sure! Look at step two in the guide, and choose the option to add a floating button to one page only. It’s easier to do this if you’re on the business plan or above as you’ll add the HTML snippet into the page header code injection rather than the site wide code injection panel.
-
It shouldn’t do no. We’re adding a very small bit of HTML and styling it (it’s quicker than loading an image for example) and not using any javascript which can slow loading times down.
Step One: Create the HTML for your floating button
There are a few different ways we can create a floating button on Squarespace, but my fave, is by adding a spot of HTML that we then use CSS to style.
The HTML is a bit like adding a text, or image (or even button) block, and the CSS we add later will allow us to make it look exactly how we’d like.
So let’s start by creating the HTML snippet.
There are several things here that you’ll need to personalize…
The page you want people to be sent to when clicking the button. In the below example this is /your-url-slug , but of course it can be the url slug for whatever page you want to send people to on your site. One word of caution as you change this snippet is to make sure to leave the double quotation marks either side of the link in place.
The text you’d like to show up on your floating button. In the example below this is “Book a free chat”. You’ll notice this doesn’t need quotation marks, but does need a space between the two greater-than/ less than signs > Your button text <
Make sure that all of the other punctuation & spacing remains the same :)
<!--FLOATING CALL BUTTON-->

<div id="floating-button">
  <a href="/your-url-slug"> Your button text </a>
</div>
Feeling out of your depth?
You don’t need to go it alone. Book a power hour & we’ll whizz through your questions & to-do list together!
Step Two: Add the HTML for your floating button
Now the second thing we need to do you need to do is decide which pages of your Squarespace site you’d like your button to show up on.
If it’s all pages on your site (like mine) you’ll want to add your html code snippet to your site-wide header code injection panel.
To find this the easy way (Squarespace does have a habit of moving menu items around!), hit shift & forward slash /. A search box will appear.
Type the word “code” into it & select Header Code Injection.
You’ll then see the Header Code Injection Panel open up, and you can paste your HTML snippet in.
Pro tip - be careful not to mix it up with any code that’s already there. Scroll right down to the bottom, and then hit enter to add a few lines of space. Then paste your HTML snippet in.
If it’s just one singular page, you’ll want to add your html code snippet to the specific page (or pages) header code injection.
To find this, go to the pages menu.
Find the page you’d like to add the snippet to & hit the gear icon.
Head to Advanced and you’ll see the header code injection.
Past your HTML snippet in. (As before, make sure to do this a few lines below any existing code you have there.
Pro tip - Page level code injection is only available on business plans & higher, so if you’re on the personal plan you’ll need to add the button as a code block on the page itself.
To do this…
Open up the page where you’d like to add the snippet.
Add a code block.
Copy and paste your HTML snippet into the code block.
Hit save.
Now, when you open the page you added it to (or any page if you added to your site-wide code injection) you should see something that looks like this…
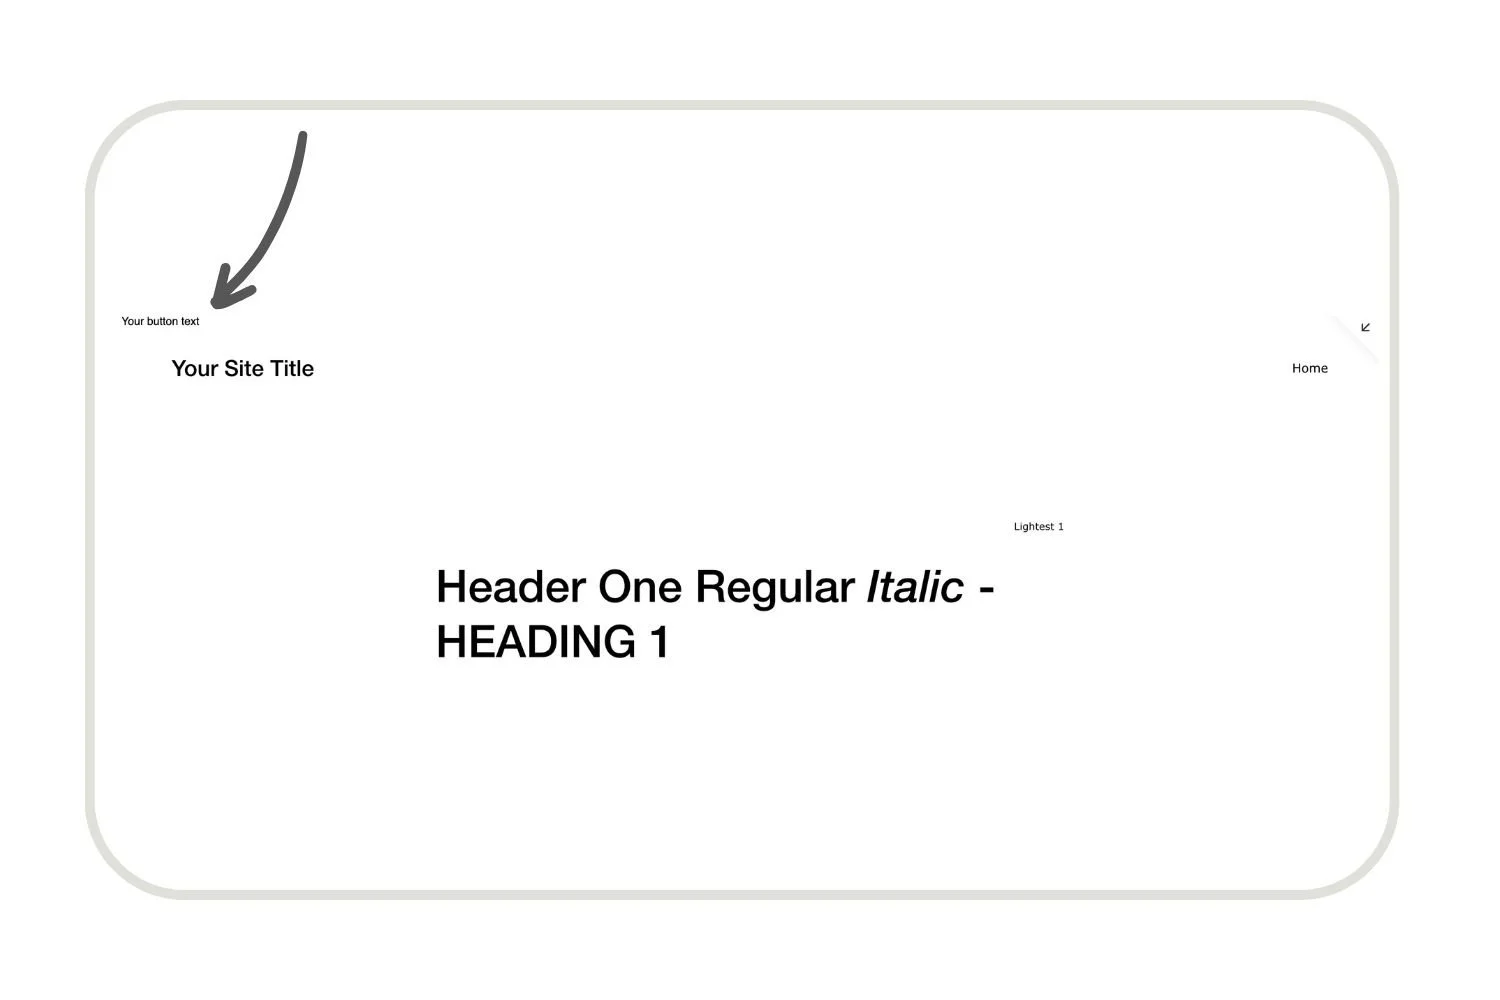
Wahoo! Now we’re cookin’ on gas & it’s time for the fun bit - to do some stylin’!
Step Three: Position your floating button with CSS on Desktop
First things first, this next bit of action is goin’ down in your CSS panel.
This you can find by going to “Design” and “Custom CSS”, or (in case Squarespace have moved it!) hitting shift and forward slash”/” typing in CSS and selecting the custom CSS button.
The first bit of CSS to add is below.
One important thing to check first is that the #floating-button is the same as the way you named your button when adding your HTML snippet. If you changed this, you need to make sure these CSS snippets are changed too as it’s using these words (in fancy codey speak) a “Div ID” that Squarespace finds the thing that we’re applying our CSS to.
/*STYLES FOR FLOATING BUTTON */

#floating-button {
  position: fixed;
  top: 50%;
  right: 0;
  transform: rotate(90deg) translateX(50%);
  transform-origin: 100% 0;
  z-index: 99999;
}
Now let’s talk through the rest of the snippet and what it means:
position: fixed
This means that your button will stay still and not move as you scroll up or down the page
top: 50%
This means your button will live 50% from the top of the page (Want it higher or lower? You can adjust this percentage)
right: 0
This means your button will stick to the right of your page like a tab.
transform: rotate(90deg) translateX(50%)
This line spins our button around so it’s vertical
transform-origin: 100% 0
And this line tells Squarespace on what point you want to spin your button from!
z-index: 999999
Finally the z index brings your button to the front of everything- so that it always sits on top and is visible (you can think of the z-index like layers - the higher the number, the higher the layer it’s on.

Voila, that’s the breakdown of what this first snippet of CSS means for your Squarespace floating button… but it’s probably looking a lil‘ something like this now… and still needs some work. So let’s keep going.
Loving this & got a taste for more creativity with code on your site? Check out this free CSS workshop from my mentor Rache at Square Stylist!
Step Four: Style your Squarespace floating button with CSS on Desktop
If all of the previous steps were about positioning your floating button, now we’re all about styling it & making it look beautiful!
You’ll notice that after the “#floating-button” div id, that we have the letter “a”. This tells squarespace that we’re styling an active link (which is what we added when we added our html snippet).
#floating-button a {
  background: #000000;
  color: white;
  display: inline-block;
  font-size: 14px;
  text-transform: uppercase;
  font-family: montserrat;
  font-weight: 400;
  letter-spacing: 0.3em;
  padding: 10px 30px;
  border-radius: 0px 0px 10px 10px;
  transition: ease 0.5s !important;
}
Now let’s talk through the rest of this CSS snippet for styling your floating button on Squarespace, and what it means so you can tweak it for your own brand and style.
background
This is the color of your floating button. You can add one of your brand colors in Hex Code or RGB form here.
color
Just to be confusing this is the color of the text on your floating button
display: inline-block
this is how the words are displayed (you don’t need to play with this)
font-size
As expected! This is the size of font for the words on your button. You can choose pixels for this (which means it always stays the same) or rem which means it will resize as your screen does.
text-transform
Here you can choose uppercase, lowercase or capitalize. I recommend staying consistent with the other buttons on your site.
font-weight
Here you can add a number (usually from 200 up to around 800) and Squarespace will opt for the font weight available for your font that’s closest to the number you choose. Otherwise you can forget this line altogether if you’re happy with the standard font weight.
letter-spacing
If you LOVE a nicely wide spaced full caps button text #guilty! you can edit your letter spacing here - usually around 0.2em to 0.3em will do the job. Not a fan? You can delete this line & leave it as is.
padding
This is super important to make your button look like a button. The first number is the padding you’ll see on the left/ right of your button (a bit different to usual because our button is spun around!) The second number is the padding toward the top and bottom of your screen. Confused? Leave it as it is, or just play around until you’re happy!
border-radius
If you wanna add a nice smooth curve to your button’s edges to give it a tab like feel, you can do this with your border radius. As you look at your button on screen, the 3rd number is the top left, and 4th is bottom left. The corners closest to the edge of the screen are the first 2 numbers. Like square edges, delete this row, or set all numbers to 0.
transition: ease 0.5s !important
This last line is a preview of what’s to come!! If you’d like to go one step forward and add a gorgeous hover animation to your squarespace floating button then you’ll want to keep this line in, and follow me on to the next stage!)
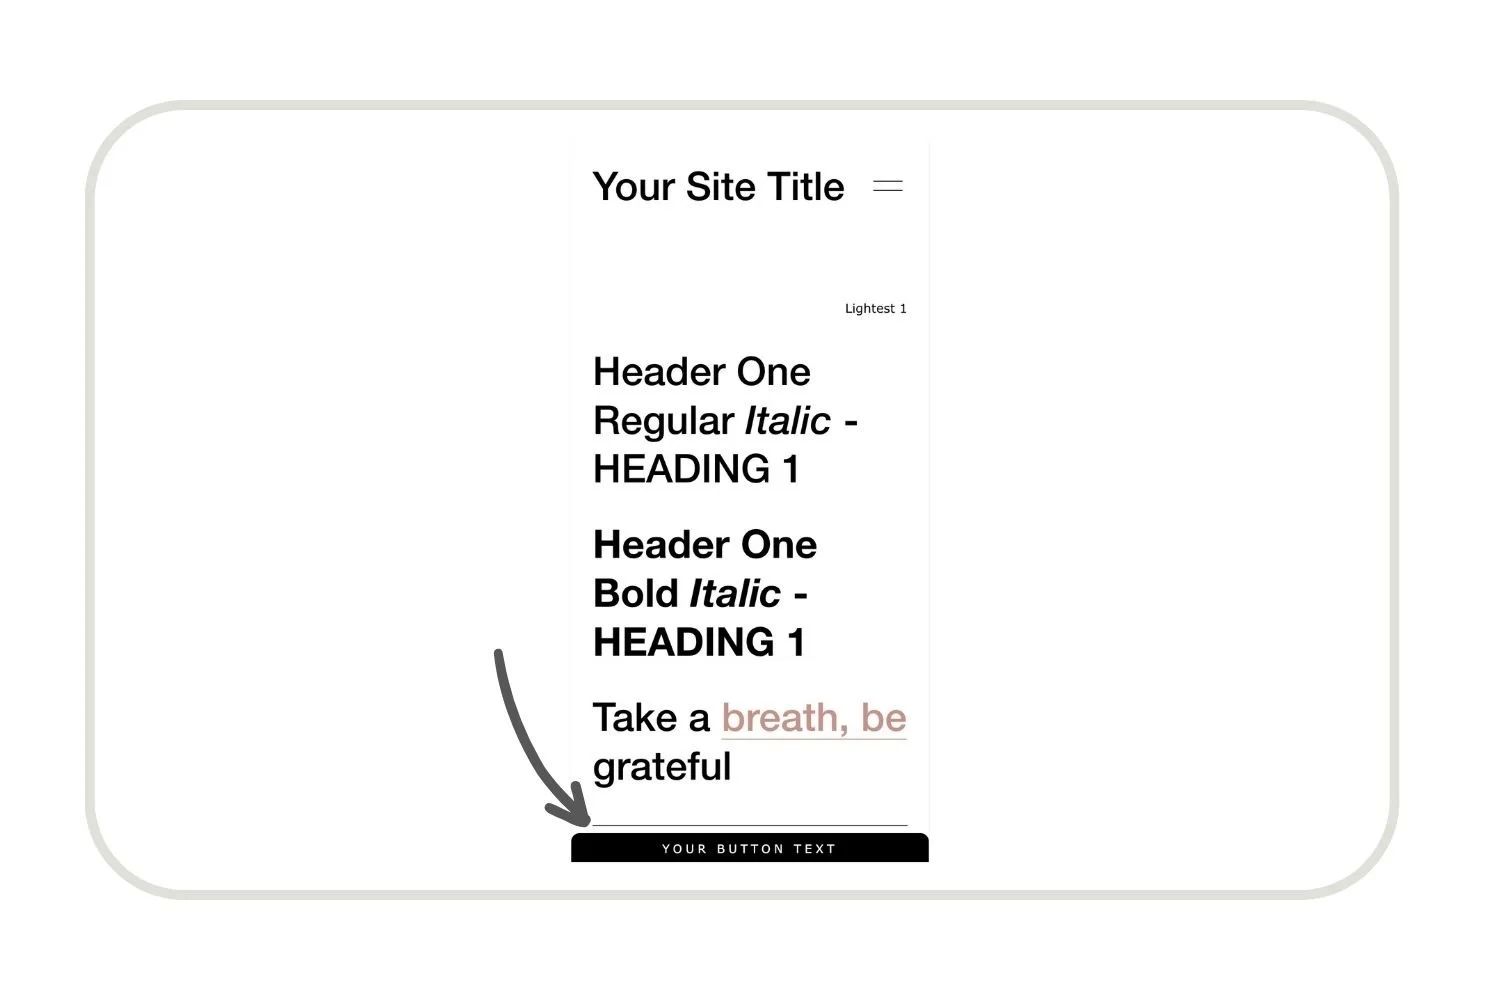
Now your floating button should be looking rather beautifully like this!

Step Five: Add a hover animation to your squarespace floating button
Think of this as the cherry on top, not strictly speaking necessary! But as you know… cherrys are the best bit, so let’s do it and add a Floating Button Animation to our Squarespace site.
#floating-button a:hover {
    padding: 20px 40px;
  background: #555555;
  }
Hover effect for sticky floating button on Squarespace
What this little CSS snippet addition does is to slightly increase the size of the button on hover, and to change its color too.
Here you can change the numbers in “padding” to adjust how much the button increases in size on hover, and of course you can add your own hex code so that the color on hover is on point for your brand too!
But don’t peace out just yet… coz if you know your onions you’ll know that a goood percentage of your website traffic is on mobile, so we wanna give our mobile styling a lil’ love too. So here goes!
Step Six: Styling Your squarespace floating button on Mobile
Having your floating button to the right on mobile can make the user experience tricky for a few reasons…
First, it’s likely to cover important screen elements as you don’t have as much space and padding on a more vertical screen. And second, given that most people are right handed and using their phone with their thumbs coming from the right, it’s easy for them to accidentally brush the button without meaning to… annoying.
So let’s position the floating button at the bottom of the screen on mobile.
@media screen and (max-width: 768px) {
  #floating-button {
    bottom: 0;
    top: auto;
    transform: none;
    left: 0;
    text-align: center !important;
  }

  #floating-button a {
    padding: 10px 0px;
    border-radius:10px 10px 0px 0px !important;
    width: 100% !important;
  }

}
So there you go! Everything you need to implement your own floating call to action button on Squarespace… and make it look beautiful!
If you loved this & wondering how I learnt to use code to make my Squarespace sites standout - the answer is Standout Squarespace - IMHO, the secret to becoming a true Squarespace expert! Check out my review of the Standout Squarespace course here! And any questions about my experience - shout!
Oh & before I go…
Still need a hand? Book a power hour and I’ll happily implement this code for you, and any other bits n bobs on your to do list!


New on the ‘Gram…