My Fave (FREE) Email Signature Software (& how to use it)

Wrapping up a recent custom website project for the wonderful Lauren, I added a special touch—a custom email signature.
This sparked an idea: Why not share the secrets behind crafting a sleek and professional email signature?
And so that’s exactly what I’m doing!
Happily it’s pretty simple to do with my fave email signature software and a few pro tips - but it’s something I get a lot of questions about in in my inbox so I thought it was high time to pop a quick guide together.
This post may contain affiliate links. If you make a purchase via one of these links I may get a small kickback. I only recommend products and services I use and love myself! Thanks in advance :)
Prefer to watch? Here’s the step by step video guide to creating a professional email signature using a free email signature Software
Finding an Email Signature Software
Let’s kick things off with the HubSpot Email Signature Software (not an affiliate link, just the one I’ve used & like - oh & it’s free). In the vast sea of tools available, this one stands out for its reliability and ease of use. Of course, feel free to explore others, but for my own signature, HubSpot has been my go-to.
It’s worth saying that you’ll need to sign up for a Hubspot account to be able to copy your email signature , or get your email signature html code, but you can always unsubscribe afterwards so it’s no big.
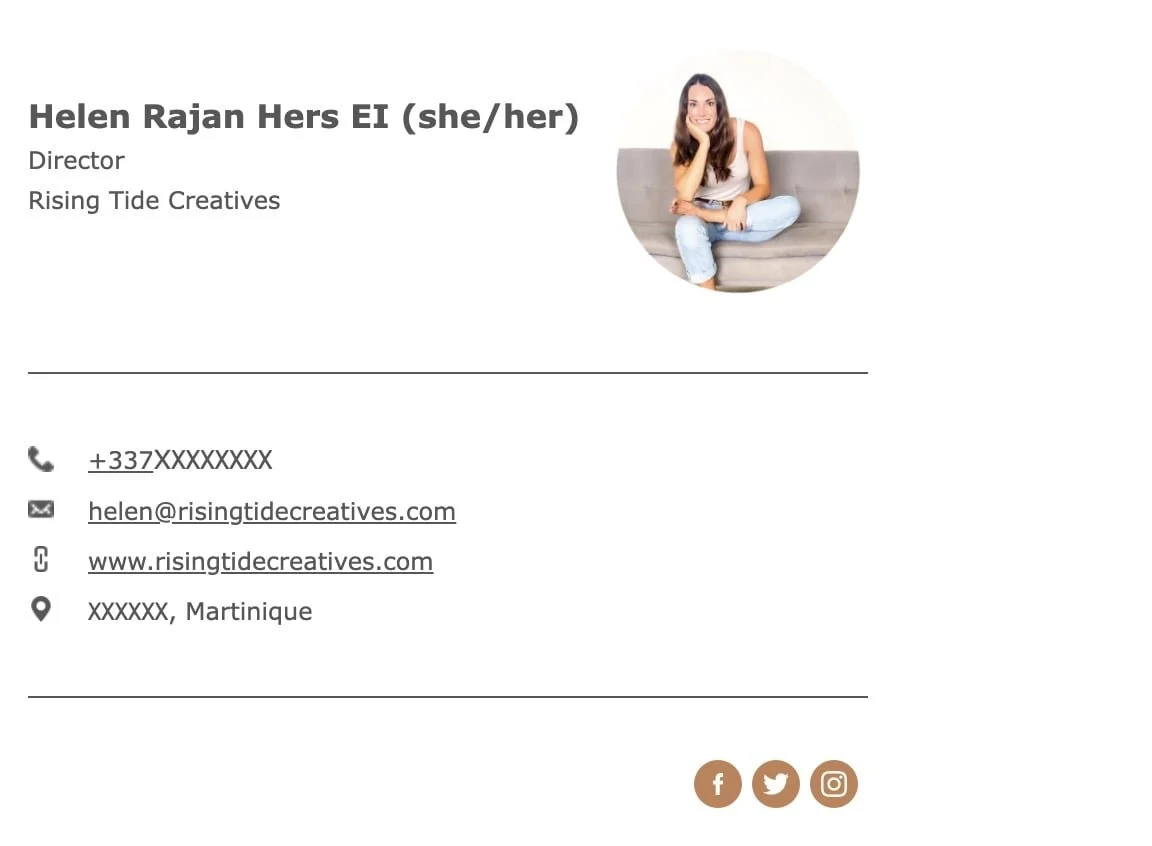
Oh - and wondering what my email signature made in the Hubspot email signature software looks like? Check it out below!
Choosing Your email signature Template
Selecting the right template is the first step and you have quite a bit of choice in the hubspot email signature maker. I personally lean towards ones that offer space for a photo, your essential contact information, and social media links, making it not just professional but also personal.
Template 5 in the Hubspot email signature maker, for example, ticks all these boxes beautifully, but you do you, as long as you can add the key info you’re going to need you’re golden.
Personalizing Your email Signature
Next up, add your details to the email signature maker.
This includes your name, job title, company, website URL, and email address.
Adding Email Signature Social Media Icons
Adding social media icons turns these into clickable icons, which look neat & clean, but isn’t essential, so you can choose what you do and don’t want to include based on your own business needs & strategy.
Branding your email signature
Adjusting the colors to match your brand ensures consistency across all touchpoints your audience have with you, and so I highly recommend grabbing your brand hex codes & adding them into the email signature maker. Aim for a color scheme that stands out for readability (choose a darker font color so it contrasts well) and aligns with your visual identity.
Struggling to decide on your brand colours? Make sure to read these 5 Simple Steps to Choosing a Color Palette
Email Signature Fonts
You might notice that there isn’t a tonne of choice when it comes to fonts for your email signature (this is to make sure your signature displays well across all browsers/ email servers), so just pick one that’s easy to read & close to your brand style. I tend to prefer sans-serif font choices for this, but choose in line with your branding.
Adding Logos and Calls-to-Action Using the email signature maker
The next step is to add a logo and/or a professional photo to your signature.
I like having both an image of you (it makes your emails feel much more personal - people get less shouty when they can see the face of the person they’re emailing!) and your logo to keep your branding consistent. The template we chose at the beginning works for both of these.
It can also be a great idea to add a call to action to guide recipients towards your latest offer, blog post, or resource depending on what the people receiving your emails will find most useful or engaging. You can do this by adding a CTA button, or a linked CTA graphic/ image.
getting around the issue with the hubspot Email Signature Software not showing images from google drive in its email signatures
There’s a common issue noted on a bunch of email signature maker threads (yup they exist!) bemoaning the fact that googledrive image links don’t work any more in hubspot email signatures.
I had the same issue, so I jumped into detective mode & figured out a workaround if you have a Squarespace site.
Head to the CSS panel (hit “/ CSS” if you’re not sure where to find it)
Then head to files up at the top & select “add file”.
Upload your image here (I recommend PNGs with transparent backgrounds)
…and then, making sure your cursor is at the very top of your CSS panel click it once to get the link (it’ll automatically paste it into your CSS panel).
Next - cut that link and paste it into your browser, you should see the image you added appear.
If that’s all good, then you’re set. Now just head back across to your Hubspot email signature maker & paste the link in to whichever image space (profile pic/ logo/ CTA image) it’s for & rinse & repeat for the others!
Adding Your Email Signature on gmail
Once you’re happy with your design, HubSpot gives you a how-to guide for the process of adding your new signature to various email platforms like Gmail, Outlook, or Yahoo! Mail.
All you need to do is click the “copy signature” or “copy signature source code” to get the email signature html code, and then sign up for a hub spot account.
Once you’ve done that & confirmed your email, you may need to pop the link to the email signature maker back into your browser in case you think it’s disappeared, you should be able to click the button “copy signature” or “copy signature source code” again & your signature will be copied.
Then just follow the step by step instructions for your email platform & you’re all set!
On Gmail, these steps are to…
Log into your gmail account
Click the gear icon to open up settings
Click “see all settings”
Scroll down to signature and click “create new”
Give your signature a name
Copy and paste your signature in (either the code or the plain version)
Then make sure to set your signature defaults (just below) to use your new signature.
Et Voila!
So there you have it—a step-by-step guide to creating an email signature using a simple (and free) email signature software to give yourself greater brand consistency & a more professional email.
In my view, it’s more than just a sign-off; it’s a reflection of you and your business & totes worth the few minutes it takes to get it set up.
Questions or successes you’d like to share?
I’d love to see the email signatures you’ve created - send me an email & I’ll make sure to hit you back to fan-girl over your work!